This guide will show you how to use WSFTP to connect and upload to your webspace. This is a guide for Plusnet customers but the steps should be similar for other webhosts.
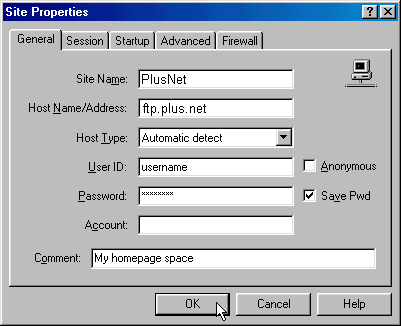
Start WS FTP for the first time and you will be shown the Site setup box.
- The Site Name box is simply a title for the connection that you are creating - it can be anything that you like.
- Host Name/Address is the server to which you are uploading
- The User ID and password are the login details for your webspace
If you're not sure which details to use, see our
Webspace Connection Details page for help.

Once you've done this, click OK to connect to your web space.
Once you have connected, the screen should look something like this:

When connecing to your standard webspace you'll need to go to the htdocs directory to upload files. On the CGI server you can upload your files wherever you like.
Select any files that you want to transfer in the local system window and then click the right pointing arrow to transfer them to the web space side.
You can also transfer directories and their contents in this manner.
The other way is to drag files from another location and drop them onto the right hand window. The disadvantage of this method is that it doesn't transfer directories.
When you have finished transferring files, you can terminate the connection with the close button.